Using bt2 in VS Code Jupyter Notebooks on Gadi
This guide describes how to create a custom Jupyter kernel for VS Code on Gadi that supports the Babeltrace2 Python bindings (bt2).
This approach runs notebooks on a login node, which is not recommended for routine use. It is intended only as a temporary workaround until the cpu target issue affecting Babeltrace2 in ARE Jupyter environments is resolved, see model-tools#20. Once that issue is addressed, users should be able to use bt2 directly through ARE Jupyter without this workaround.
This custom kernel ensures that:
- the Babeltrace2 module is loaded,
- your project virtual environment is activated,
- Jupyter starts using that correctly configured environment.
Once set up, import bt2 will work as expected in VS Code Jupyter notebooks.
Step 1: Create a Jupyter kernel directory
First, create a directory for the new Jupyter kernel specification:
mkdir -p ~/.local/share/jupyter/kernels/esmf-trace-bt2
Step 2: Create the kernel.json file
Next, create a kernel.json file in that directory. This file defines how the kernel is started. Replace /path/to/venv with the path to your project’s virtual environment.
cat > ~/.local/share/jupyter/kernels/esmf-trace-bt2/kernel.json <<'JSON'
{
  "argv": [
    "bash",
    "-lc",
    "module use /g/data/vk83/modules && module load model-tools/babeltrace2/2.1.2 && source /path/to/venv/bin/activate && exec python -m ipykernel_launcher -f {connection_file}"
  ],
  "display_name": "Python (esmf-trace + bt2)",
  "language": "python"
}
JSON
bt2 module is loaded and the virtual environment is activated before the Jupyter kernel starts.
Step 3: Reload VS Code
VS Code needs to reload in order to discover the new kernel. Open the Command Palette and reload the window:
Cmd + Shift + P -> Developer: Reload Window
Step 4: Select the new kernel in your notebook
Open your Jupyter notebook (.ipynb) in VS Code, then:
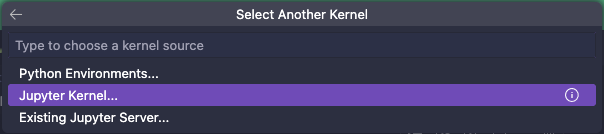
- Click the kernel picker in the top-right corner,
- Then select
Jupyter Kernel...underSelect Another Kernelas shown in below screenshot, - Then you will find (
esmf-trace + bt2/bash).
Step 5: Verify that bt2 is available
Run the following code in a notebook cell to confirm that the kernel is correctly configured:
import sys, bt2
print(sys.executable)
print(bt2.__file__)
If the output resembles the following, the setup is successful:
/path/to/venv/bin/python

/g/data/vk83/apps/spack/0.22/release/linux-rocky8-x86_64_v4/intel-2021.10.0/babeltrace2-2.1.2-ltovcvuzu5wur7aghkw53wlk7gwj65pe/lib/python3.11/site-packages/bt2/__init__.py